Processing calcium imaging data
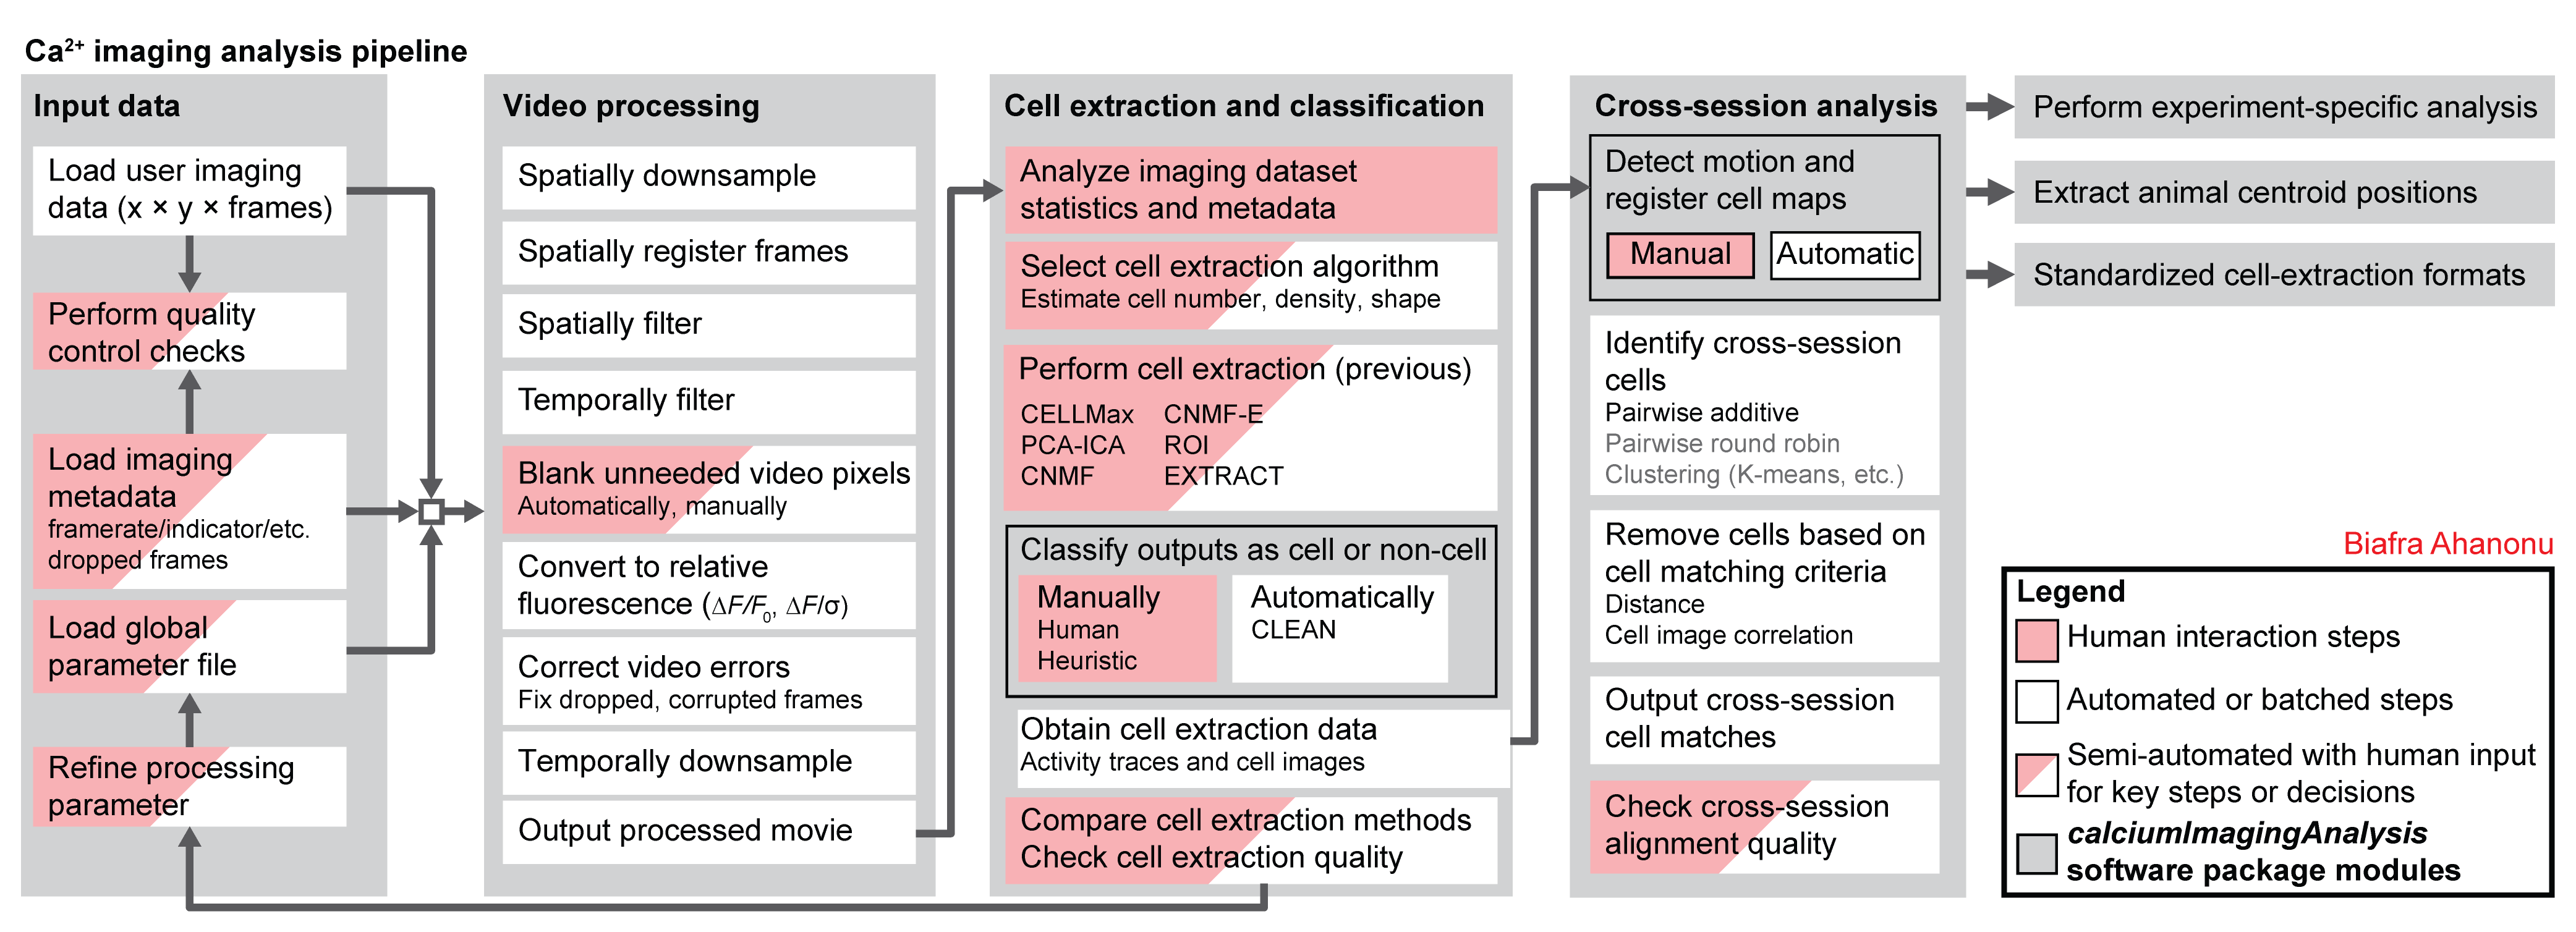
The general pipeline for processing calcium imaging data is below. This repository includes code to do nearly every step.
Guides
Below are recordings for users who want to learn more about calcium imaging analysis.
Webinar
This webinar gives an overview of calcium imaging analysis (with a focus on CIAtah) along with tips for improving experiments and analysis: https://info.inscopix.com/inscopix-inspire-view-webinarbiafra-ahanonu-signal-in-the-noise-distinguishing-relevant-neural-activity-in-calcium-imaging.
Workshop tutorial
This recording gives an overview of setting up and using CIAtah: https://www.youtube.com/watch?v=I6abW3uuJJw.
Workflow
To start using the CIAtah software package, enter the following into the MATLAB command window.
% Loads all directories
loadBatchFxns;

% Loads the class into an object.
obj = ciatah;

% Open the class menu
obj % then hit enter, no semicolon!
% Alternatively
obj.runPipeline; % then hit enter!
The general order of functions that users should run is ([optional] are those not critical for most datasets):
loadDependencies- If user is running CIAtah for the first time, this module has several options to download and load CNMF/CNMF-E code for cell extraction, Fiji for viewing/modifying videos (using Miji), and test data from a miniature microscope experiment.
modelDownsampleRawMovies[optional]- If users have raw calcium imaging data that needs to be spatially downsampled, e.g. raw data from Inscopix nVista software.
modelAddNewFolders- Users should always use this method first, used to add folders to the current class object.
- For example, if users ran
example_downloadTestData.m, then add the folder[githubRepoPath]\data\2014_04_01_p203_m19_check01_rawwheregithubRepoPathis the absolute path to the currentCIAtahrepository.
viewMovie- Users should check that CIAtah loads their movies correctly and that Miji is working.
- Users can view movies from disk, which allows checking of very large movies quickly.
- Remember to check that
Imaging movie regexp:(regular expression class uses to find user movies within given folders) setting matches name of movies currently in repository.
viewMovieRegistrationTest[optional]- Users can check different spatial filtering and registration settings.
tregRunXfolders (whereXis a number) contain details of each run setting. Delete from analysis folder if don't need outputs later.- Remember to adjust contrast in resulting montage movies since different filtering will change the absolute pixel values.
modelPreprocessMovie- Main processing method for CIAtah. Performs motion correction, spatial filtering, cropping, down-sampling, and relative fluorescence calculations. If using Inscopix nVista 1.0 or 2.0, also will correct for dropped frames.
modelModifyMovies- GUI that allows users to remove movie regions not relevant to cell extraction.
modelExtractSignalsFromMovie- Performs cell extraction on processed movies. Currently supports PCA-ICA, CNMF, CNMF-e, ROI, and EXTRACT. Support for CELLMax will be enabled in the public repository upon release.
modelVarsFromFiles- Run after
modelExtractSignalsFromMovieto load cell image and trace information into the current class object.
- Run after
viewCellExtractionOnMovie[optional]- This function overlays the cell extraction outputs on snippets of the processed video, allowing users to check that cell extraction correctly identified all the cells.
computeManualSortSignals- A GUI to allow users to classify cells and not cells in cell extraction outputs.
modelModifyRegionAnalysis[optional]- Users are able to select specific cells from cell extraction manual sorting to include in further analyses.
computeMatchObjBtwnTrials- Method to register cells across imaging sessions. Also includes visual check GUI in
viewMatchObjBtwnSessionsmethod. - Note: it is heavily advised that throughout a particular animal's imaging sessions, that you keep the acquisition frame dimensions identical. This makes cross-session registration easier. Else you will have to crop all sessions for that animal to the same size ensuring that the area of interest is present in each.
- Method to register cells across imaging sessions. Also includes visual check GUI in